About this book
Sketch the bone. Label the joint. Explain the pull.
A college course companion for the skeletal and muscular systems. Connect bone structure and remodeling to function, identify a core set of major bones, classify joints, trace muscle organization down to the sarcomere and the sliding filament model, and reason about attachments, levers and muscle roles. Every lesson follows the same seven steps, from a readiness check to explained answers.
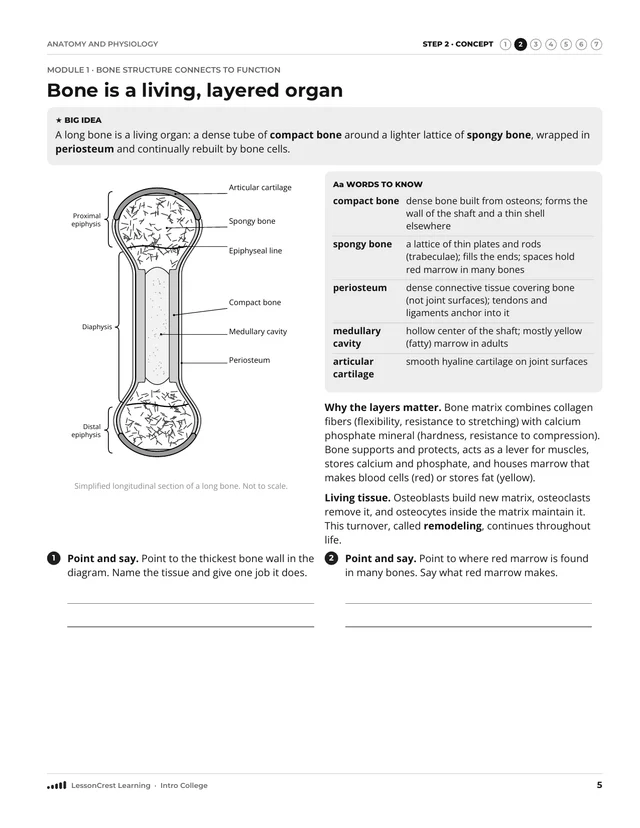
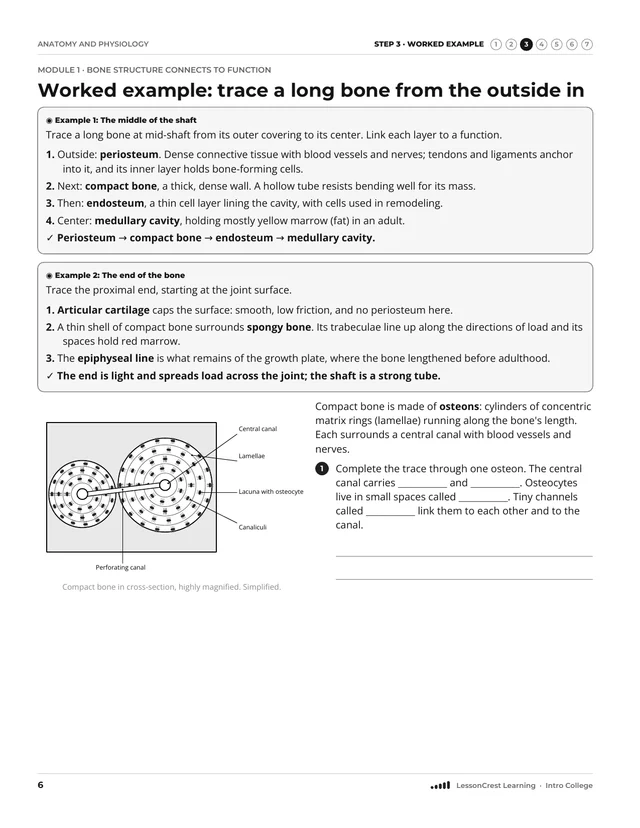
- Long bone anatomy, the osteon and bone remodeling
- Major bones, joint classes and synovial joint types and movements
- Muscle levels of organization, sarcomere bands and how a muscle contracts
- Origins, insertions, lines of pull, levers and agonist–antagonist roles
With explained answers for every page
Look inside
What this book covers
Covered
It covers bone tissue and remodeling, a limited set of landmarks, joint classification, muscle organization down to the sarcomere, and the mechanics of selected limb movements.
Not covered
It does not cover injury, diagnosis, rehabilitation or exercise programs, and it is not medical advice.
Before you start, you should be able to
- Use proximal, distal, medial and lateral on a limb
- Name the sagittal, frontal and transverse planes
- Recognize epithelial, connective, muscle and nervous tissue
- Describe what mitochondria and ribosomes do
- Find the fulcrum, effort and load on a simple lever
Notices
This book teaches anatomy and physiology. It does not give medical, injury, rehabilitation or exercise advice.
Pictures in this book are simplified learning models. Check answers with the explanations at the back of the book.
The steps in this book
- Step 1: Readiness Check
Check the skills you need before you begin. If something feels tricky, an adult can help you start in the right place.
- Step 2: Concept
Read a short, clear explanation of the new idea and the words that go with it.
- Step 3: Worked Example
Watch the idea being used, one step at a time, in a worked example.
- Step 4: Guided Practice
Practice with prompts and help cues. The help gets smaller as you get stronger.
- Step 5: Independent Practice
Practice on your own with different kinds of questions, and explain your thinking.
- Step 6: Review
Look back at earlier learning so it stays strong, then check where to go next.
- Step 7: Answers and Explanations
Check your answers. Each answer explains why, names a common mistake, and shows how to fix it.
What is in the book
The modules
- Module 1: Bone structure connects to functionPages 5–14
- Module 2: Skeletal landmarks and joint organizationPages 15–24
- Module 3: Muscle structure produces tensionPages 25–34
- Module 4: Attachments and coordinated movementPages 35–44
Contents
- Readiness check, pp. 3–4. Before Module 1. Its table tells you where to start.
- Modules, pp. 5–44
- Checkpoints, pp. 14, 24, 34, 44. The last page of each module.
- Mixed review, pp. 45–48. Questions from across the book, mixed together.
- Exit check, pp. 49–50. A last check across the book.
- Reflect and repair, p. 51
- Try again, p. 52. Fresh questions like those in the exit check.
- Answers and explanations, pp. 53–64. Notes in this part are headed “Why”, “Common mistake”, “Help” and “Look for”.